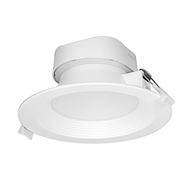
This ceiling light is more eco friendly with energy saving and money saving techniques that can help make your home Energy Efficient. The dimmable quality of this downlight will also add a new varying experience to how you choose to light the area it is placed. The integrated J-box will allow for easy replacement from previous lights as long as you pick the right replacement size.
This 9 Watt Direct Wire Downlight that’s 5-6 inches wide will provide bright LED lighting for the kitchen, hallway/walkway, and entrance ceiling lights. The LED Lighting will be brighter than the traditional lighting and can add some style and modern upgrades than traditional bulging out lights that are normally in the home. The ceiling light is more eco friendly with energy saving and money saving techniques that can help make your home Energy Efficient. The dimmable quality of this downlight will also add a new varying experience to how you choose to light the area it is placed. The integrated J-box will allow for easy replacement from previous lights as long as you pick the right replacement size. Do pay attention to the older light that was taken out and the replacement does need to be the same for exact fitting. This light is IC Rated and can be directly wired.
Light Bulb Buying Guide
Highlights
Solid State LED Lighting
Long Life
Integrated J-Box for Direct Wire Installation
Dimmable
IC Rated
120 Voltage
9 Watts
65 Watt Incandescent Equivalent
Direct Wire Downlight
Frosted Finish
700 Lumens
MOL 2-13/16 inches
MOD 6-11/16 inches
3000 Kelvin Temperature
Soft White Light
100 Beam Spread Degrees
5- 7/8 inch cutout
1-1/4 inches Max Drywall Thickness
Energy Star Rated
RoHS Compliant
Reviews
There are no reviews yet.
Be the first to review “9W Direct Wire Downlight 5-6 inches LED Lighting” Cancel reply
“Changing a light bulb sounds like an easy process, and sometimes it is. However, there are important safety measures to keep in mind. Sometimes, you will need to replace a light bulb that is trickier. For example, perhaps the bulb is in a very high vaulted ceiling or is a car dome light.
1. Make sure the power is turned off. This is a good idea any time you are messing around with electrical fixtures. Why not be safe?
Just switch the red power button to “off” in your fuse box. Be aware this will shut off all of your power, not just for one fixture.
You should also unplug the lighting fixture before you change the light bulb (if it’s a fixture with a plug, that is). If you don’t, you could risk getting shocked. Always be careful around electricity.
2. Take other safety measures. There are a few things you should keep in mind, especially if the bulb is high up in the ceiling.
Let the bulb cool off before you unscrew it. If the light was on recently, the bulb will be hot to the touch, and you could burn your fingers.
If the bulb is in a ceiling fixture, don’t try to balance on an unsteady chair or something similar. Use a sturdy stepladder. That way you can reach the light bulb without falling.
Instead of a step ladder, you can buy a special extension tool to switch a light bulb that is very high up. This is often safer than trying to climb a ladder. And remember: You could always hire a handyman! You shouldn’t need any other tools to change a light bulb in a lamp fixture.
3. Take the bulb out of the socket. If the fixture is easy to reach, such as a lamp, the process is pretty straightforward. Sockets do differ depending on your lighting fixture.
If you have a bayonet mount, which is common in the UK and places like New Zealand, hold the bulb gently but firmly, and then push down and turn the bulb counter-clockwise. This should release it from the socket. This type of socket has two prongs.
If the socket has a screw fitting, which is common in America and throughout Europe, you should gently twist the bulb counter clockwise. It should then come loose from the socket, and you can remove it.
4. Put a new bulb in the socket. In order to put a new bulb into a lighting fixture’s socket, you will want to turn the bulb in a clockwise direction. Just remember: Counter-clockwise to remove; clockwise to insert.
The bulb might lock into place or you might have to twist it a bit until you can’t twist it anymore. This will depend on the socket. Don’t screw the bulb too tight or it could break. If you have a bayonet bulb, you will need to align the bulb’s base with the two pins. Push down and then twist upwards, using a clockwise motion.
In the case of a screw cap bulb, simply place it into the hole and then twist it. You will usually want to choose a bulb that has the same wattage as the old bulb, unless you want softer or brighter light than what you already had.
Check the label on the bulb socket or fixture for the max watt/amp rating. Make sure the bulb’s power rating doesn’t exceed that allowed by your lighting fixture (check with the manufacturer or packaging).
5. Get rid of the bulb safely. Be aware that light bulbs are very fragile. Thus, you don’t want to just toss them haphazardly in your garbage can. If the bulb breaks, the shards can cut someone.
Wrap the old bulb in the new bulb’s package before throwing it away. You could also wrap the old bulb in a newspaper or old magazine.
Throw the bulb away in places that children can’t reach. Make sure to recycle the bulb if possible or required in your area.”
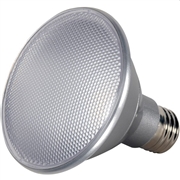
The 13PAR30 Short Neck 3000 Kelvin Temperature 120 Volt LED Light Bulb we offer here at Conserv-A-Store is a great bulb for replacement of older bulbs or changing over to making the home more energy efficient. With that in mind, these bulbs are built to last a long time and make sure you get your money's worth.


Reviews
There are no reviews yet.